If you want to speed up your WordPress website and improve its performance, security, and reliability, you should consider integrating it with Cloudflare. Cloudflare is a global network of servers that can cache your website content, optimize your images, and protect your site from malicious attacks.
In this blog post, we will show you how to integrate your WordPress website with Cloudflare caching and image optimization using the Cloudflare WordPress plugin. We will also explain the benefits of caching and the page rules that you need to create for optimal results.
What is Caching and Why is it Important?
Caching is a process of storing copies of your website content on different servers around the world. This way, when a visitor requests your website, they can get the content from the nearest server instead of your origin server. This reduces the latency, bandwidth usage, and load on your server.
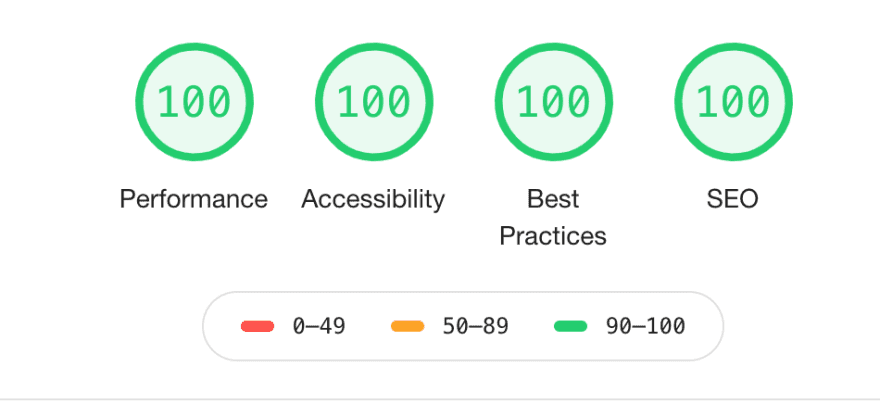
Caching can improve your website speed, user experience, SEO rankings, and conversion rates. It can also save you money on hosting costs and reduce the risk of downtime.
However, not all content on your website can be cached. For example, dynamic content that changes frequently or depends on user input (such as login pages, shopping carts, or comments) cannot be cached. You need to configure your caching settings carefully to avoid serving outdated or incorrect content to your visitors.
How to Integrate Your WordPress Website with Cloudflare Caching and Image Optimization
To integrate your WordPress website with Cloudflare caching and image optimization, you need to follow these steps:
Step 1: Sign up for a Cloudflare account and add your website
First, you need to sign up for a Cloudflare account and choose a plan that suits your needs. Cloudflare offers free and paid plans with different features and support levels.
Then, you need to add your website to Cloudflare by entering your domain name and following the instructions. Cloudflare will scan your DNS records and copy them to its own servers.
Step 2: Change your nameservers to point to Cloudflare
Next, you need to change your nameservers at your domain registrar to point to Cloudflare. This will allow Cloudflare to handle all the traffic to your website and apply its caching and optimization features.
You can find the nameservers that Cloudflare assigns to your website in the DNS app of the Cloudflare dashboard. You need to copy them and paste them in your domain registrar's dashboard.
It may take some time for the DNS changes to propagate across the internet. You can check the status of your website in the Overview app of the Cloudflare dashboard.
Step 3: Install and configure the Cloudflare WordPress plugin
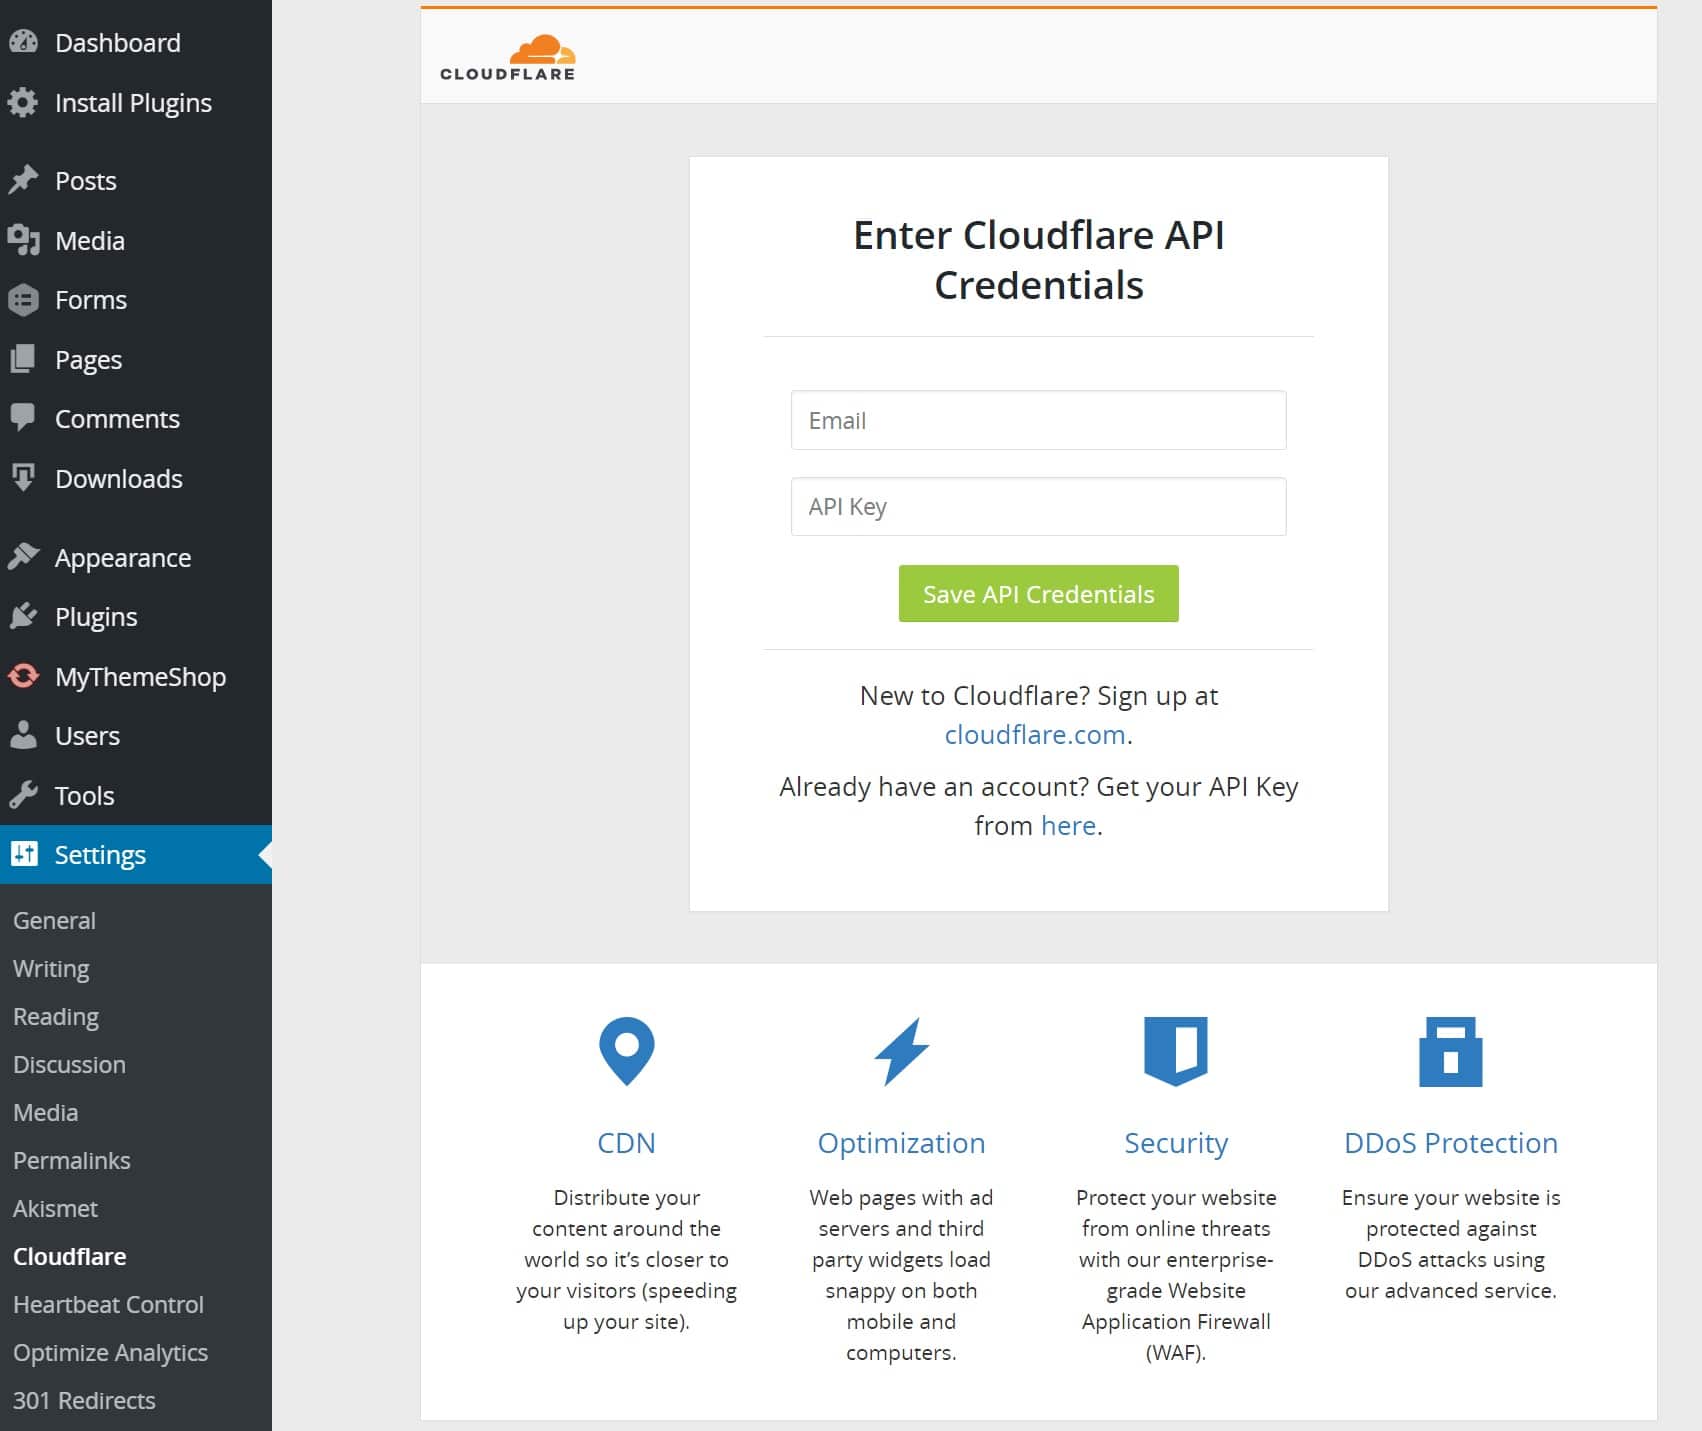
Now that you have connected your website to Cloudflare, you need to install and configure the Cloudflare WordPress plugin on your WordPress site. This plugin will help you manage some of the Cloudflare settings from within your WordPress dashboard.
You can install the plugin from the WordPress repository or by uploading it manually. After activating it, you need to enter your email address and API key that you can find in the My Profile section of the Cloudflare dashboard.
Then, you need to enable some of the features that the plugin offers:
- Automatic Cache Management: This feature will automatically purge the Cloudflare cache when you update or publish a post or page on your WordPress site. This will ensure that your visitors always see the latest version of your content.
- HTTP/2 Server Push: This feature will allow you to push necessary assets (such as CSS and JavaScript files) to your visitors using HTTP/2 protocol. This will reduce the number of round trips required to load your website and improve its performance.
- Automatic HTTPS Rewrites: This feature will rewrite any HTTP links on your website to HTTPS if you have enabled SSL on Cloudflare. This will prevent mixed content errors and secure your website.
Step 4: Customize your Cloudflare configuration with additional features
After configuring the Cloudflare WordPress plugin, you can customize your Cloudflare configuration with some additional features that can further improve your website performance and security. You can access these features from the Cloudflare dashboard.
Some of these features are:
Managed Ruleset: This feature will enable a set of firewall rules that are specifically designed for WordPress sites. These rules will protect your site from common threats such as SQL injection, XSS attacks, brute force login attempts, etc.
Page Rules: These are rules that allow you to customize how Cloudflare handles specific URLs or patterns on your website. You can use them to fine-tune your caching settings, redirect traffic, enable additional features, or disable certain features for specific pages. For example, you can use page rules to:
- Force HTTPS for all requests
- Bypass the cache for your WordPress admin area
- Cache static HTML pages for anonymous visitors
- Redirect XMLRPC requests to your homepage
- Decrease the bandwidth of your WP uploads folder
- Make important pages always online
- Enable email obfuscation on your contact page only
You can create up to 3 page rules for free accounts and up to 100 page rules for paid accounts. You can also reorder your page rules to give priority to the most specific ones.
To create a page rule, go to the Rules app in the Cloudflare dashboard and click on Create Page Rule. Then, enter the URL pattern that you want to match and select the settings that you want to apply. You can also choose the order of the page rule (first, last, or custom).
Here are some examples of page rules that you can create for your WordPress website:

This page rule forces HTTPS for all requests to your website. You can also enable this setting in the SSL/TLS app under Edge Certificates.
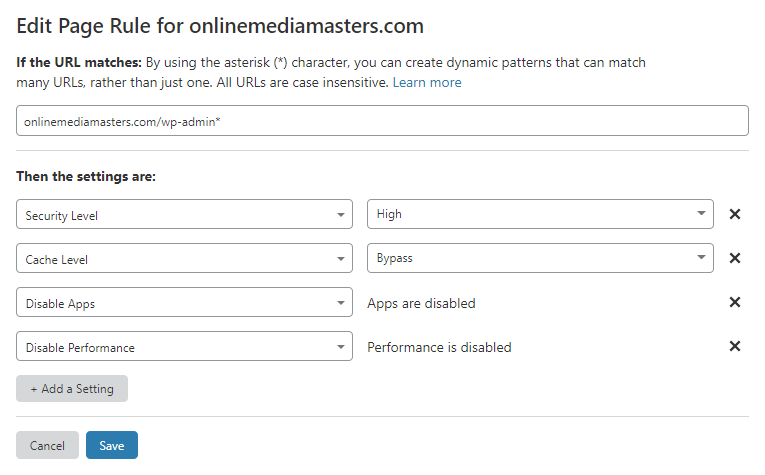
This page rule bypasses the cache for your WordPress admin area and sets the security level to high. This will prevent caching issues and protect your site from brute force attacks.
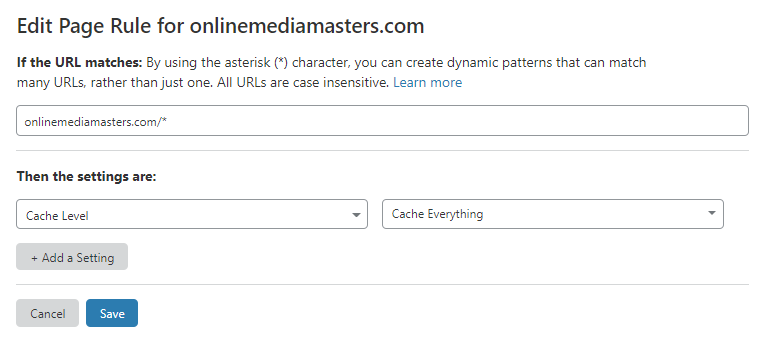
This page rule uses Cache everything lets Cloudflare cache HTML which can make a large improvement when testing your site in tools like KeyCDN’s performance test.
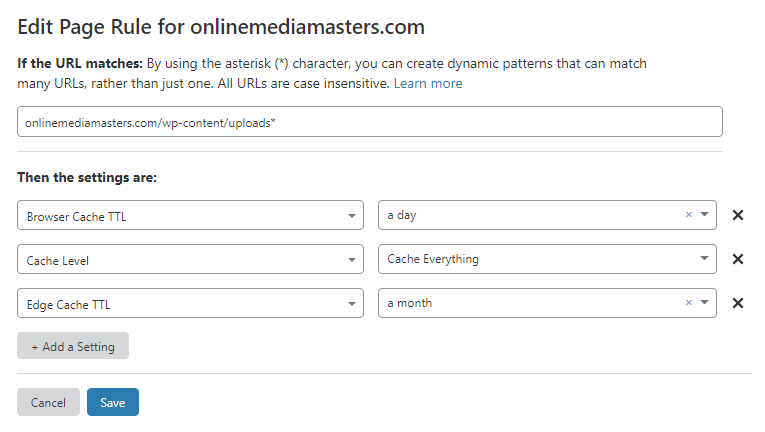
This page rule saves bandwith by caching uploaded files.
You can find more examples of page rules in this article External link icon Open external link .
Step 5: Optimize images with Polish and Mirage
Cloudflare can also help you optimize your images with two features: Polish and Mirage.
Polish will compress your images and strip unnecessary metadata to reduce their file size and improve their load time. You can choose between lossless or lossy compression depending on your preference.
Mirage will optimize your images for mobile devices by resizing them according to the screen size and network connection of the visitor. It will also lazy load your images so that they are only loaded when they are visible on the screen.
You can enable these features in the Speed app under Optimization. You need a Pro plan or higher to use Polish and Mirage.
Step 6: Enable HTTP/2
HTTP/2 is a newer version of the HTTP protocol that allows for faster and more efficient data transfer between servers and browsers. It supports features such as multiplexing, header compression, server push, and prioritization.
To enable HTTP/2 on your WordPress website, you need to make sure that your site is loaded over HTTPS. You can do this by enabling SSL on Cloudflare and creating a page rule to redirect all HTTP requests to HTTPS.
You can also use the Cloudflare WordPress plugin to enable HTTP/2 server push for certain assets on your site. This will allow you to send CSS and JavaScript files to your visitors before they request them, reducing the number of round trips required to load your site.
To enable HTTP/2 server push, go to Settings > Cloudflare > Home in your WordPress dashboard and check the box next to Enable HTTP/2 Server Push.
Step 7: Minify HTML, CSS, and JavaScript
Minification is a process of removing unnecessary whitespace, comments, and code from your HTML, CSS, and JavaScript files. This will reduce their file size and improve their load time.
Cloudflare can minify your assets without any change to your website. You can enable this feature in the Speed app under Optimization. You can also disable certain types of minification if you encounter any issues with your site functionality.
Alternatively, you can use a build tool such as Grunt or Gulp to minify your assets as part of your development process.
Conclusion
Integrating your WordPress website with Cloudflare caching and image optimization can have a significant impact on your site performance, security, and reliability. By using Cloudflare, you can benefit from:
- A global CDN that caches your content across 250+ data centers
- A free SSL certificate that secures your site and enables HTTP/2
- A web application firewall that protects your site from common threats
- An image optimization service that compresses and resizes your images
- A page rule system that allows you to customize your caching and security settings
- A web analytics tool that gives you privacy-first insights into your site traffic
- A WordPress plugin that makes it easy to manage your Cloudflare settings
To integrate your WordPress website with Cloudflare caching and image optimization, you need to sign up for a Cloudflare account, add your website, change your nameservers, install and configure the Cloudflare WordPress plugin, and customize your Cloudflare configuration with additional features.
We hope this blog post has helped you understand how to integrate your WordPress website with Cloudflare caching and image optimization. If you have any questions or feedback, please leave a comment below.
Helpful links
- https://support.cloudflare.com/hc/en-us/articles/227634427-Using-the-Cloudflare-plugin-with-WordPress
- https://support.cloudflare.com/hc/en-us/articles/228503147-Speed-Up-WordPress-and-Improve-Performance
- https://www.cloudflare.com/pg-lp/cloudflare-for-wordpress/
- https://support.cloudflare.com/hc/en-us/articles/218411427-Understanding-and-Configuring-Cloudflare-Page-Rules-Page-Rules-Tutorial-
- https://onlinemediamasters.com/cloudflare-page-rules-for-wordpress/